JavaCC 6.1.0 adds a new flag that attempts to makes it easier to share boilerplate classes between multiple parsers in the same codebase.
Imagine the scenario, you have a project, and it has two or more parsers, which you are generating using JavaCC. You wish to deploy the application via GWT, so it is important for each parser to be as small as possible. Let's use an example.
A super trivial language grammar (as per the javacc/gwt blog), the reference parser :
Generated Classes for the reference parser (10 generated .java classes) :
Size of jar file (including .class and .java resources in the jar file):
38 Kilobytes inclusive of source is actually a pretty good size for a generated parser and all the associated overhead classes (although I'm sure level 9 could do better). But how much of that applies the the grammar definition and how much is boilerplate?
Boilerplate classes for the reference parser (marked in grey):
If we disregard our .jj grammar definition file, that leaves only 3 classes that are unique to our particular parser, with the remaining classes, boilerplate.
Now lets define a second super trivial grammar (almost identical to the first), and levering the new GENERATE_BOILERPLATE=false option:
A second grammar:
The two active configuration items are as follows:
1) // Flags not to create boilerplate classes options { GENERATE_BOILERPLATE = false; }
2) // References boilerplate classes in another package. import org.consoli.javaccgwt.example1.parse.*;
Now, using the JavaCC plugin for Eclipse, or manually executing javacc at the command line, use JavaCC (6.1.0 or above) to generate code for the second grammar definition.
Let us now review the generated classes (there are only 3 generated classes, down from 10 if boilerplate classes were included):
Now lets look at the size of the generated jarfile (including .class and .java resources in the jar file):
That is a roughly 24K jar-file size reduction. Admittedly, it isn't very much, and that includes the source code being included in the jar-file, so lets assume that in the real world it is a 12K per-additional-parser saving. It isn't much - but it is at least something, and less bytes for the same functionality can only be a good thing when it comes to reducing initial-load web app latency.
Key Points
This guide assumes the JAVA_TEMPLATE_TYPE = "modern"; style of code generation.
At least one set of the boilerplate classes are essential to operation of a JavaCC generated parser. It is not possible to eliminate usage of boilerplate classes, such classes are essential and it is only possible to eliminate duplicates.
One parser must generate boilerplate classes (we call this the reference parser).
Other parsers may or may not specify the "GENERATE_BOILERPLATE = false;" option, and in doing so, JavaCC will not generate boilerplate classes in the same package. The only benefit of this is saving bytes and of course there is no harm in duplicating boilerplate if low code size is not a design requirement.
The non reference parsers MUST import the reference parsers package in general, or all the boilerplate classes explicitly in order to be able to function.
The non reference parsers MUST be able to access the reference parsers boilerplate classes on the classpath at runtime in order to be able to function.
Github repo corresponding to this example, see the Example1 (reference parser) and Example2 projects.
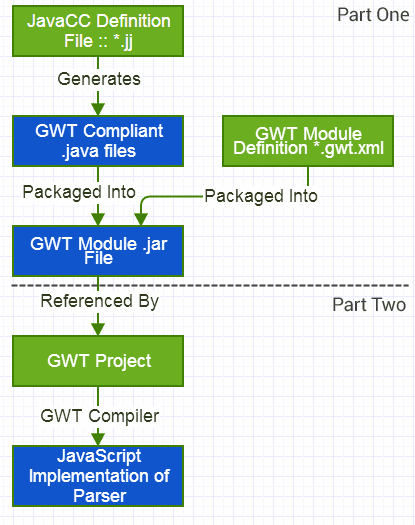
This is the second part of a tutorial on how to create a basic parser for use in client-side GWT code (this tutorial uses Eclipse Kepler). A github repo has been created containing the files corresponding to both parts of this tutorial. In the first part of the tutorial, we created a GWT compatible parser module using JavaCC. In this second tutorial, we will wire up the GWT module to a basic GWT project. This tutorial makes heavy use of animated gifs, which I make no apologies for - but sorry. Part Two Step 7 - Create a Web Application (GWT) Project (using Eclipse)
Step 8 - Strip out the sample HTML from the generated project (Example1UI,html).\
Step 9 - Add the parser GWT module jarfile OR the pre-requisite parser project (** shown in the gif below) to the Java Build path of the GWT Project
Step 10 - Reference the parser GWT module from the newly created GWT UI project .gwt.xml file.
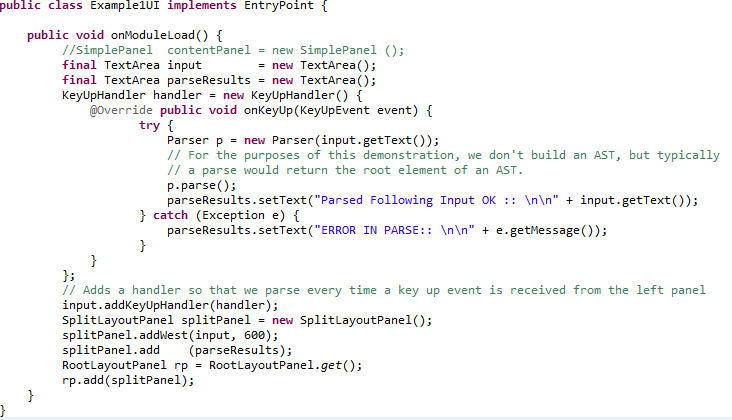
Step 11 - Write code in Example1UI project to use the parser on the client side. The code can be found here.
Step 12 - Compile GWT Project To compile, simple right click the Eclipse1UI project, go to "Google" then click "GWT Compile" and click the "Compile" button.
Step 13 - A Parser in JavaScript Finally, here is the parser running entirely in client-side JavaScript via the magic of the GWT compiler.
Conclusion
JavaCC is certainly not the best parser generator looking at the quality of the generated code but it is (almost uniquely) excellent at generating small parsers with no external dependencies therefore it was the ideal candidate to adapt for GWT. These tutorials demonstrate the steps required so that JavaCC and GWT together can be leveraged so that JavaScript can be targeted. Building a runtime that avoids non-emulated GWT classes can be a challenge, but it is achievable. Also achievable are C# parsers generated from the same codebase translated via sharpen, but that is a significantly more complex tutorial. Github Location
Source corresponding to this tutorial has been posted on github here. This includes 6.1.0 Release Candidate 1 of JavaCC and corresponding license files for the sake of convenience.
This blog (and its sequel) describe how to leverage new features of JavaCC so that Java can be used to create parsers that can run inside a modern browser.
Executing parsers on the client side versus on the server side can lead to better responsiveness, lower network utilization, and using JavaCC as the parser generation engine with Java as the runtime engine allows developers to leverage all the benefits of statically typed language and enterprise tooling that they know and love whilst exploring the exciting world of domain specific languages.
The first part of this tutorial (spread over two posts) deals with creating a simple GWT compatible parser module using Eclipse. It requires JavaCC 6.1 or above, which is currently in the release candidate phase (at time of writing).
The second part of this tutorial deals with setting up a GWT project that will import the GWT module that we create in this first part of the tutorial.
These blogs are very IDE and screenshot-centric, and if this becomes tiresome, simply jump to github for sample code. This tutorial does not deal in the complexities of using JavaCC grammar definitions itself and uses a trivial grammar for the purposes of this tutorial.
JavaCC's "modern" mode
JavaCC 6.1 introduces "modern" mode, which requires an opt-in option setting (for purposes of backwards compatibility).
Modern mode only apples when JavaCC is generating Java code (JavaCC also has C++ code generation options) and what this means is generating cleaner Java code with a number of enhancement versus compatibility (the default) mode.
Here is a rough summary of the benefits:
Improved code generation.with significantly less warnings.
Ability to share boilerplate code between different parsers in the same codebase (use the GENERATE_BOILERPLATE = false; option).
Loose coupling of parser IO through an introduced interface called Provider". This allows parsers to be executed in client-side GWT/Android/Sharpen (experimental) amongst other use-cases.
Better exception handling (no more java.lang.Error objects being thrown and force-closing server VMs).
Generation of an additional (small) String based constructor for all parsers by default.
Follow the instructions on the GWT plugin for Eclipse page. (This is not required for part one of the tutorial but will be required for part two).
Download JavaCC 6.1+ (currently a release candidate) from the following location.
Step 2 - Create and setup an Eclipse project for the parser
Step 2.1 - Create a new Java Project
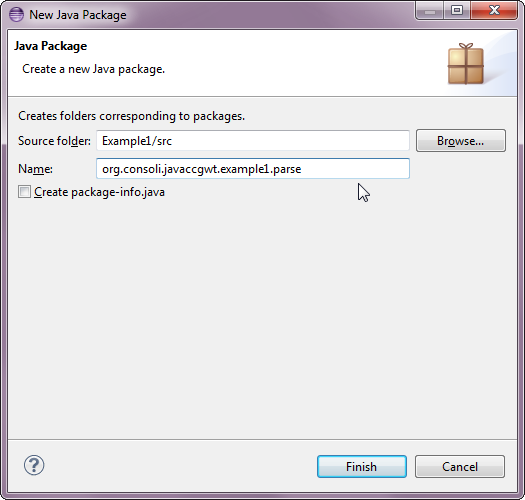
Step 2.2 - Within the new project, create a package named 'parse'.
Step 2.3 - Right click on the project, and go to "Properties"
Step 2.4 - Select the "JavaCC Options" list item on the left, then click "Browse" next to the "Set the JavaCC jar file" row (as shown in the screenshot). When the file dialog appears set the JavaCC jar to a JavaCC 6.1.0+ JavaCC jarfile (available here). This is essential otherwise JavaCC will not generate GWT compatible code.
(before)
(after)
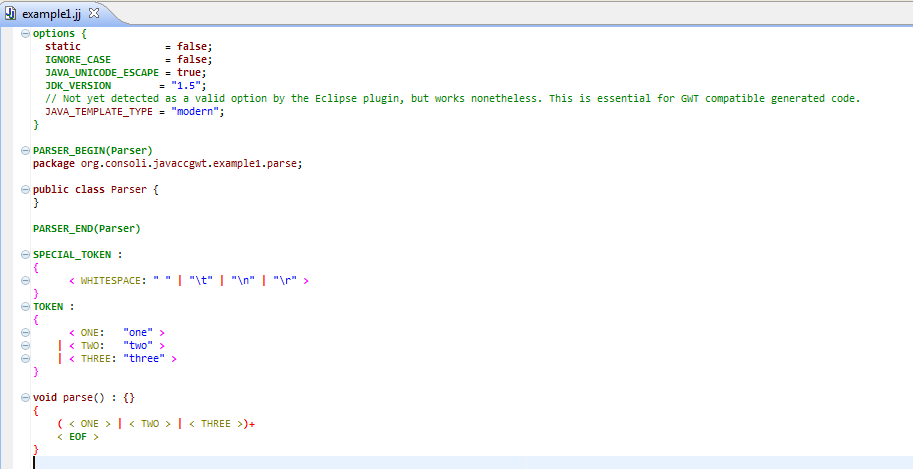
Step 3 - Create the parser definition and generate the parser Step 3.1 - Within the parse folder, create a new file called 'example1.jj'.
Step 3.2 - Put the following contents into the generated file (gisthere), then save.
** This is a trivial parser that accepts any combination of the words "one" "two" and "three", ignoring whitespace characters such as spaces, tables, line feeds and carriage returns. For the purpose of this tutorial, I will not be building an AST (hence the return type of void).
*** The critical line here is JAVA_TEMPLATE_TYPE = "modern";, this enables GWT compatible code generation and if omitted will revert to JavaCC's legacy code generation (the default may be changed in future JavaCC code releases).
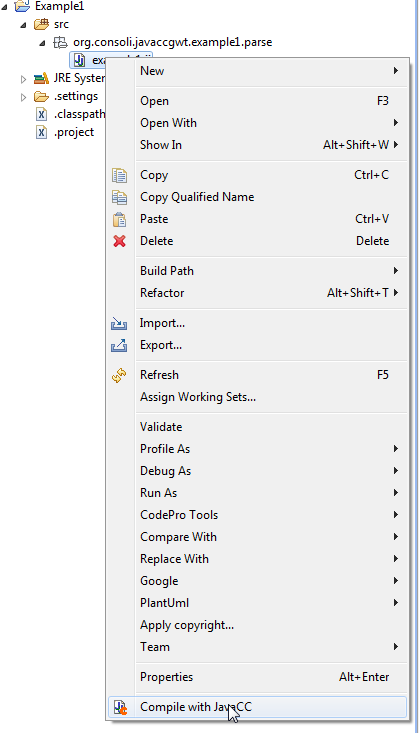
Step 3.3 - Compile the JavaCC parser by right clicking on the .jj file and selecting "Compile with JavaCC" (this will use the JavaCC jar file in the per-project settings configured in step 2.4). If not compile the .jj file via the Eclipse plugin then examine the JavaCC command line options for an alternative method of code generation.
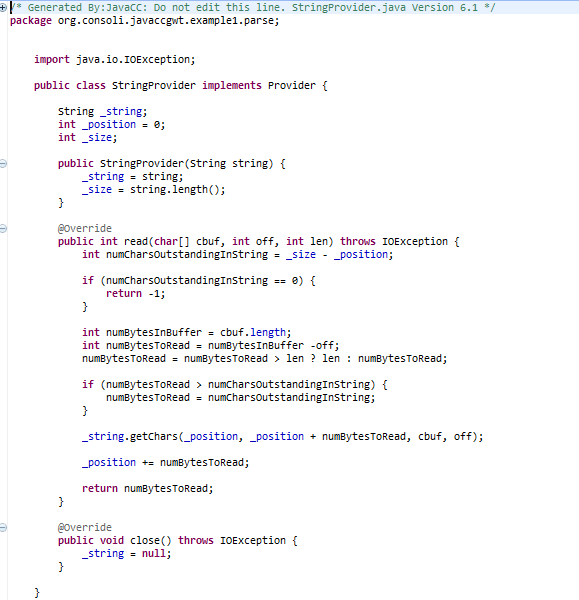
(The generated files)
(The Provider Interface is new to JavaCC 6.1, and is required for GWT compatibility)
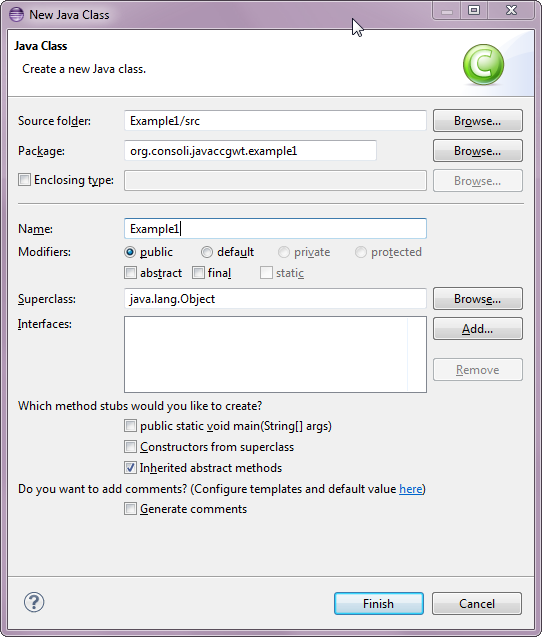
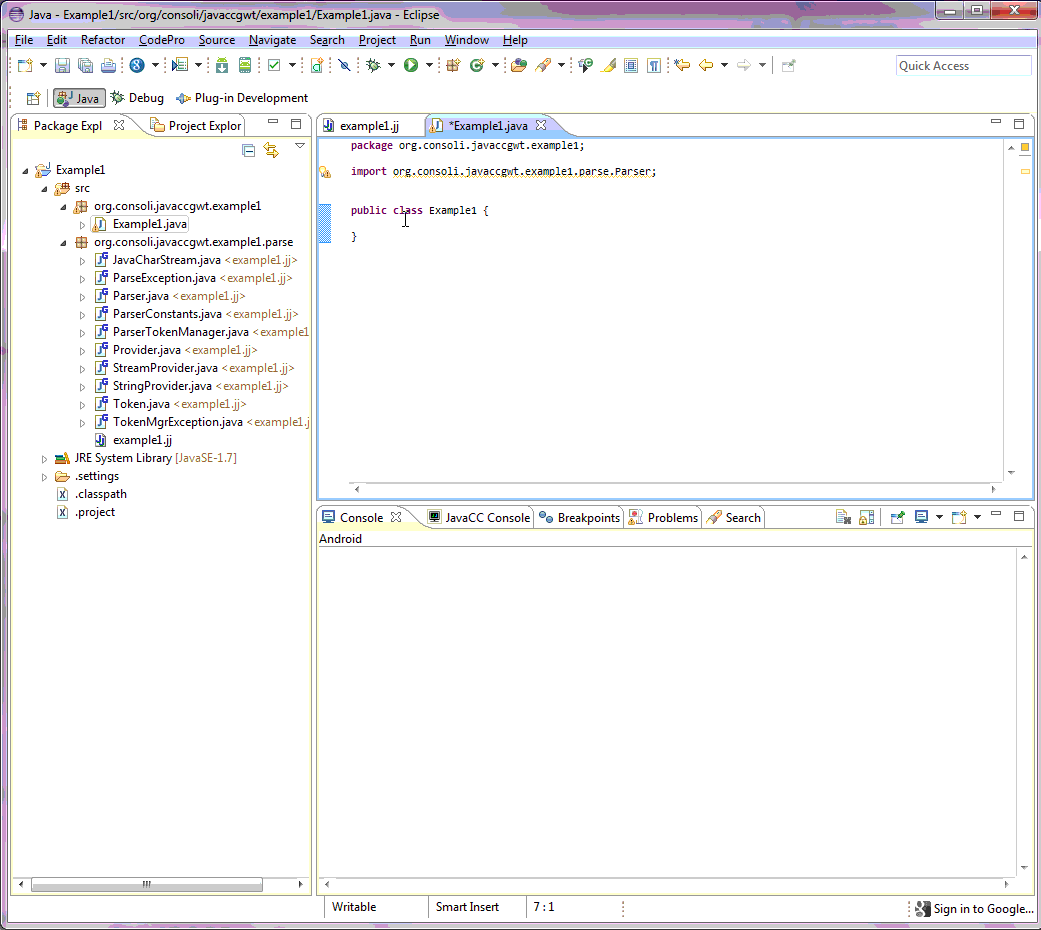
Step 4 - Build an (optional) bootstrap class with which to test the parser Step 4.1 - Now create a class called "Example1", this will contain a basic entry point to test our parser.
(A simple bootstrap example class)
Step 5 - Adding in the GWT Module Descriptor
Step 5.1 - Create a new folder named "resources" underneath the "Example1" project. Those who use Maven project layouts can use "src/main'java" and "src/main/resources" as their root source paths, but for this example, we will simply create a folder called "resources" parallel to the existing "src" folder underneath the project.
(Creating the folder. Right click "Example1" project, then select "Folder".)
(The New Folder Dialog)
(Now add the new folder to the build path)
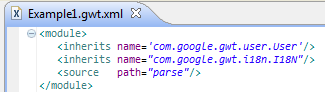
Step 5.2 - Create GWT Module file "Example1.gwt.xml". Right click on the Example1 project in eclipse and go to the "New" menu, then select "File" from the submenu.
Step 5.3 - Add the following body to the module file (can be copied and pasted from here). The first two inherits are standard for GWT, the important line is the line containing the "" tag. This corresponds to a package underneath the package in which the module file resides (although in the parallel src tree). Parsers that use an AST or utility classes will likely have multiple packages to list here (such as "model" or "ast" or "utils"), each additional item requires its own separate "" tag.
Step 6 - Building the GWT Module jarfile
This step uses Eclipse to export the a jarfile, but you can also use Ant, Maven, Gradle or any other tool to package the GWT module.
The three requirement of a valid GWT module library are:
Create a valid YOURNAME.gwt.xml file at the package level ABOVE the parse package, preferably in a separate "resources" source tree that mirrors the package layout in your main Java source path.
Only use classes that are emulated (translatable into JavaScript) by GWT. A list of emulated classes can be found here. If the use of an unemulated class is unavoidable there are workarounds which I will cover in another blog.
Make sure that the Java source-code is packaged alongside the classes. This is required as the GWT compiler will recompile the Java source into JavaScript - but it requires the original source for this.
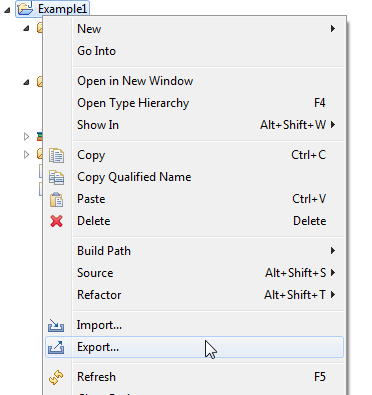
Step 6.1 - Right click the "Example" project and select "Export".
Step 6.2 - Select "JAR file"
Step 6.3 - Make sure "src" and "resources" are selected (only), and make sure "Export Java Source files and resources" is selected. Browse to a suitable JAR file location in the "Select the export destination" section.
Step 6.4 - Select the options as shown below then click "Next" (the "Save the description of this JAR in the workspace" check box is optional).
Step 6.5 - Click "Finish".
Step 6.6 - Observe the created jarfile (in this case, 38 Kilobytes).
(The jarfile contains Example1.gwt.xml and also the original Java source files)
End of Part One
As of the end of this tutorial, we have set up an example project, and created a basic GWT compatible parser module.
In the part 2, we will wire up our parser to a GWT based UI project.